FS25 Image To Fields
A downloadable tool for Windows
FS25_ImageToFields
German translation below 
For any code wizards looking at this... I'm sorry. I have almost no programming experience and a lot of the code is the work of me with the help of ChatGPT. The code is most definitely not perfectly set up.
SOURCE: https://github.com/PixelFarm1/FS25_ImageToFields
FS25_ImageToFields is a tool for easy creation of field dimensions for FS25. It takes a white on black field mask as input and creates coordinates based on the image. Through some processing it verifies that the coordinates are ordered in a way that allows for complex field shapes. The final processed coordinates are run through xmlToFields.luawhich creates fields and their respective polygons. The GE script also aligns the polygon points to the terrain and repaints all fields. All you have to do at the end is run the repaint farmlands function in the fieldToolkit of GE.
This is what a proper field mask looks like
How to use
- Make sure that you have a clean field mask. There can be no mistakes in it or you will get a bad result or errors from the program. Common mistakes are: stray white pixels in non-field areas or black pixels in white areas. Too little space between 2 field boundaries (drive an imaginary 1x1 pixel size tractor along all field borders of the mask, if you cannot pass -> fix that area).
- Run the .exe from the latest release (or main.py if you want more work)
- Click "Browse" and choose your field mask.
- Make sure to set the correct DEM size. This is the resolution of your DEM.png in the data folder of your map (-1 pixel).
- It is recommended not to change the settings on the first run but to go with the defaults. Change the settings and run again if you want to make any tweaks to the output.
- Press "Run" to start the processing. The log will tell you the output directory.
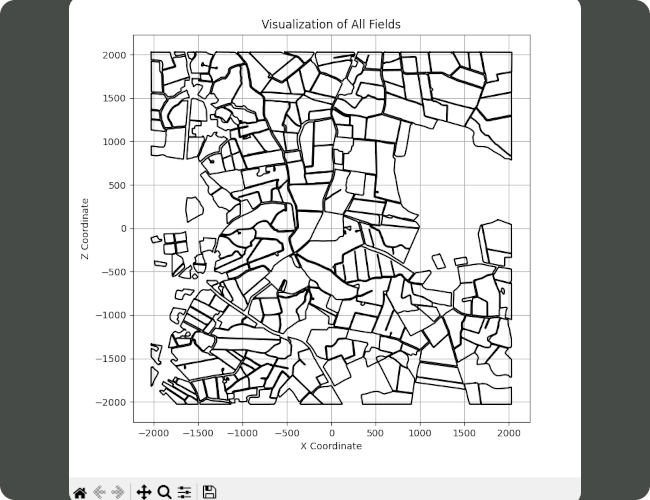
- After the processing is finished, you can press "Visualize fields" to show the final output. Toggle the IDs on and off by pressing "Toggle Field IDs".
- Go into Giants Editor and make sure that you have a "Fields" group with the correct attributes. Also remove any children of the Fields transform group.
- Create a new script in GE and paste the xmlToFields.lua contents to the file. Or just drop the whole .lua in your scripts folder for GE.
- Change the filepath at the bottom of the .lua file. It should point to the location of your final_field_coordinates.xml
- Execute the script. This will clear all existing painted field ground, generate the fields from coordinates, align them to the terrain and then repaint the fields.
Suggested workflow for converting FS22 maps
Prerequisites: A FS22 map where all fields are painted with terrainDetail (May work if you take the densityMap_ground.gdm from a FS22 savegame too, not tested)
- Convert the densityMap_ground.gdm using the converter at GDN
- Open the converted file in GIMP and add a new layer with white fill
- If the image turns all red and not white, press Image → Mode → RGB to change to RGB mode. Then recreate the layer with white fill.
- Set the blending mode to "Dodge" and merge the 2 layers
- Press Select → By Color (Shift + O) and click one of the now bright red areas.
- Look for any mistakes like missed pixels, stray pixels etc. They are easier to spot when in the select mode.
- When you are done correcting the image, create a new layer and fill it with white.
- Change blending mode to "HSV Saturation" and your field areas should turn white.
- Merge the layers and repeat step 6 to find any mistakes in the mask.
- Export with these settings:
- Run the FS25_ImageToFields tool according to the instructions above
German translation
For any code wizards looking at this... I'm sorry. I have almost no programming experience, and much of this code was created through my work with the help of ChatGPT. The code is certainly not perfectly structured.
FS25_ImageToFields ist ein Tool zur einfachen Erstellung von Feldgeometrien für FS25. Es nimmt eine Schwarz-Weiß-Feldmaske als Eingabe und erstellt basierend auf dem Bild Koordinaten. Durch eine Reihe von Verarbeitungsschritten wird sichergestellt, dass die Koordinaten in einer Weise geordnet sind, die komplexe Feldformen ermöglicht. Die final verarbeiteten Koordinaten werden durch die xmlToFields.lua-Datei verarbeitet, die Felder und deren jeweilige Polygone erstellt. Das GE-Skript richtet außerdem die Polygonpunkte am Gelände aus und übermalt alle Felder. Alles, was am Ende noch zu tun ist, ist die Funktion "Repaint Farmlands" im FieldToolkit von GE auszuführen.
So sieht eine korrekte Feldmaske aus.
Anleitung zur Verwendung
- Stellen Sie sicher, dass Sie eine saubere Feldmaske haben. Es dürfen keine Fehler in der Maske vorhanden sein, da dies zu einem schlechten Ergebnis führen kann. Häufige Fehler sind:
- Vereinzelte weiße Pixel in Bereichen, die keine Felder sind.
- Schwarze Pixel in weißen Feldbereichen.
- Starten Sie die .exe aus der neuesten Version (oder main.py, falls Sie mehr Arbeit investieren möchten).
- Klicken Sie auf "Browse" und wählen Sie Ihre Feldmaske aus.
- Stellen Sie sicher, dass Sie die korrekte DEM-Größe einstellen. Dies ist die Auflösung Ihrer DEM.png im Datenordner Ihrer Karte minus 1 Pixel.
- Ändern Sie beim ersten Durchlauf die Standardeinstellungen nicht. Verwenden Sie die Standardwerte und ändern Sie die Einstellungen erst nach dem ersten Durchlauf, wenn Sie Anpassungen am Ergebnis vornehmen möchten.
- Drücken Sie auf "Run", um die Verarbeitung zu starten. Der Fortschritt wird im Protokoll angezeigt, und das Ausgabeverzeichnis wird dort angegeben.
- Nach Abschluss der Verarbeitung können Sie auf "Visualize fields" klicken, um das endgültige Ergebnis anzuzeigen. Mit der Schaltfläche "Toggle Field IDs" können Sie die Feld-IDs ein- oder ausblenden.
- Öffnen Sie den Giants Editor (GE) und stellen Sie sicher, dass Sie eine "Fields"-Gruppe mit den richtigen Attributen haben. Entfernen Sie außerdem alle untergeordneten Objekte der "Fields"-Transformationsgruppe.
- Erstellen Sie ein neues Skript in GE und fügen Sie den Inhalt von xmlToFields.lua in die Datei ein. Alternativ können Sie die .lua-Datei in den Skriptordner von GE legen.
- Passen Sie den Dateipfad am Ende der .lua-Datei an. Der Pfad sollte auf die
final_field_coordinates.xmlzeigen. - Führen Sie das Skript aus. Es wird alle vorhandenen gemalten Feldflächen löschen, die Felder aus den Koordinaten generieren, sie an das Gelände anpassen und die Felder neu bemalen.
Download
Click download now to get access to the following files:
Comments
Log in with itch.io to leave a comment.